使用alwayson后如何收缩数据库日志的方法详解
问题描述:
在使用了alwayson后,主从库实时同步,原理是通过事务日志同步的,所以造成主数据库的事务日志一直在使用,而且无法收缩主数据库的事务日志。
在主从库同步时,收缩数据库是不起作用的。由于主数据库无法收缩,所以从数据库的日志也会一直跟着增长,造成磁盘空间一直增长。
网上大量的收缩日志的方法,基本上都不管用,怀疑根本没有在实际环境中使用过,以下方案是我在实际中使用后总结记录的。
解决方案:
最开始发现这个问题后,也是研究了好久,发现的方法,先是全手动操作。因为这些操作,并不能用语句来实现自动化,所以一直是手动处理的。
可能人都是比较懒的吧(人只有懒,才能促进机械自动化,才会有各种发表创造!不是吗?呵呵),一直想能过脚本,实现自动化。
今天终于摸索出来了,总结一下。
大概的思路如下
通过脚本将alwayson从库,从可用性数据库是移除,就是取消主从同步,这样主库变成单库模式了。然后再收缩事务日志,收缩后再把主从数据库加上。
考虑到有一点,操作中需要删除从库上的数据库,为防止操作错误,把主库的数据库删除了,这个操作相当危险啊,所以将脚本分为三个。在两个机器上来回操作。
第一个脚本在db1上执行。
第二个脚本在db3上执行
第三个脚本在db1上执行
(这里db1是主库,db3是从库。不要问我db2呢,因为创建时先创建的db2后来db2有问题删除了。你根据你的实际情况替换就行了。)
待时机成熟,或者加上判断,可以考虑将以下三个脚本合成一个脚本,然后一键执行,或者加到定时任务,每月自动执行一次。
以下脚本经过亲测可用
syncdb 为alwayson同步的名字,
dbserver1和dbserver3是主从数据库的名称。dbserver1为主库,dbserver3为从库。
:connect dbserver1 -u sa -p abc@123 是使用sqlcmd模式连接数据库,请修改后面的密码。
test为数据库名称。
1、取消主从同步
|
1
2
3
4
5
6
7
8
9
|
--- you must execute the following script in sqlcmd mode.
:connect dbserver1 -u sa -p abc@123
use [master]
go
alter availability group [syncdb] remove database [test];
go
|
2 删除从库上的数据库,在收拾后,再添加上。
|
1
2
3
4
5
6
7
|
:connect dbserver3 -u sa -p abc@123
use [master]
go
drop database [test]
go
|
3.备份事务日志,收缩日志文件,添加从库数据库。
|
1
2
3
4
5
6
7
8
9
10
11
12
13
14
15
16
17
18
19
20
21
22
23
24
25
26
27
28
29
30
31
32
33
34
35
36
37
38
39
40
41
42
43
44
45
46
47
48
49
50
51
52
53
54
55
56
57
58
59
60
61
62
63
64
65
66
67
68
69
70
71
72
73
74
75
76
77
78
79
80
81
82
83
84
85
86
87
88
|
--- you must execute the following script in sqlcmd mode.
:connect dbserver1 -u sa -p abc@123
use [master]
go
backup log [test] to disk='nul:'with stats = 10
go
use [test]
go
dbcc shrinkfile (n'test_log' , 20480)
go
use [master]
go
alter availability group [test]
add database [test];
go
:connect dbserver1 -u sa -p test@123
backup database [test] to disk = n'\\dbserver3\e$\share\test.bak' with copy_only, format, init, skip, rewind, nounload, compression, stats = 5
go
:connect dbserver3 -u sa -p test@123
restore database [test] from disk = n'\\dbserver3\e$\share\test.bak' with norecovery, nounload, stats = 5
go
:connect dbserver1 -u sa -p test@123
backup log [test] to disk = n'\\dbserver3\e$\share\test.trn' with noformat, noinit, noskip, rewind, nounload, compression, stats = 5
go
:connect dbserver3 -u sa -p test@123
restore log [test] from disk = n'\\dbserver3\e$\share\test.trn' with norecovery, nounload, stats = 5
go
:connect dbserver3 -u sa -p test@123
-- wait for the replica to start communicating
begin try
declare @conn bit
declare @count int
declare @replica_id uniqueidentifier
declare @group_id uniqueidentifier
set @conn = 0
set @count = 30 -- wait for 5 minutes
if (serverproperty('ishadrenabled') = 1)
and (isnull((select member_state from master.sys.dm_hadr_cluster_members where upper(member_name collate latin1_general_ci_as) = upper(cast(serverproperty('computernamephysicalnetbios') as nvarchar(256)) collate latin1_general_ci_as)), 0) <> 0)
and (isnull((select state from master.sys.database_mirroring_endpoints), 1) = 0)
begin
select @group_id = ags.group_id from master.sys.availability_groups as ags where name = n'yorkdb'
select @replica_id = replicas.replica_id from master.sys.availability_replicas as replicas where upper(replicas.replica_server_name collate latin1_general_ci_as) = upper(@@servername collate latin1_general_ci_as) and group_id = @group_id
while @conn <> 1 and @count > 0
begin
set @conn = isnull((select connected_state from master.sys.dm_hadr_availability_replica_states as states where states.replica_id = @replica_id), 1)
if @conn = 1
begin
-- exit loop when the replica is connected, or if the query cannot find the replica status
break
end
waitfor delay '00:00:10'
set @count = @count - 1
end
end
end try
begin catch
-- if the wait loop fails, do not stop execution of the alter database statement
end catch
alter database [test] set hadr availability group = [syncdb];
go
go
|
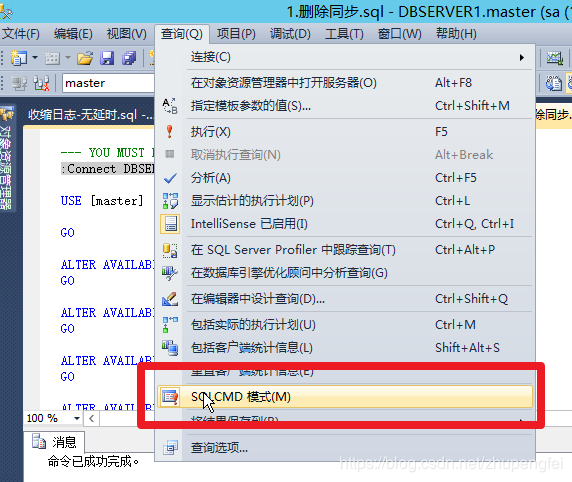
在执行:connect 命令前记得把sqlcmd模式打开

打开后,你能看到sqlcmd命令是灰色的。

到此这篇关于使用alwayson后如何收缩数据库日志的文章就介绍到这了,更多相关alwayson数据库日志内容请搜索以前的文章或继续浏览下面的相关文章希望大家以后多多支持!
原文链接:https://blog.csdn.net/zhupengfei/article/details/107223900
本文由主机测评网发布,不代表主机测评网立场,转载联系作者并注明出处:https://zhujiwo.jb51.net/shujuku/2829.html

