CentOS 7.x下的LEMP环境搭建详细教程
最近由于项目需求,将服务器从centos6升级到centos7,对应的php版本也升级到php5.6。我们熟悉的有lemp环境一键安装包,但是本文我们将单独安装各个组件模块,并搭建一个完整的php运行平台。
我们常说的lnmp环境是指linux/nginx/mysql/php组合,而lemp是什么呢?其实nginx的发音是engine-x = e,lemp包是由linux、nginx、mariadb/mysql和php组成的,那么看来lemp和lnmp是一样的,而现在业内习惯性的称作lemp。mariadb是一款社区支持驱动的mysql数据库的分支,其功能更多性能更佳,所以我们在centos7下安装mariadb。centos7我已经安装好了,现在只需安装nginx,mariadb和php。
1、安装nginx
我们从nginx官方的rpm源来安装一个预构建的稳定版本的nginx包。
|
1
2
3
|
$ sudo rpm --import http://nginx.org/keys/nginx_signing.key
$ sudo rpm -ivh http://nginx.org/packages/centos/7/noarch/rpms/nginx-release-centos-7-0.el7.ngx.noarch.rpm
$ sudo yum install nginx
|
这样,nginx就安装上了,安装完成后,nginx不会自动启动。现在需要做的是让nginx自动启动,另外还要做些配置让其可以随着操作系统启动而启动。我们也需要在防火墙里打开tcp/80端口,以使得可以远程访问nginx的web服务。所有这些操作、设置都只需要输入如下命令就可实现。
|
1
2
3
4
|
$ sudo systemctl start nginx
$ sudo systemctl enable nginx
$ sudo firewall-cmd --zone=public --add-port=80/tcp --permanent
$ sudo firewall-cmd --reload
|
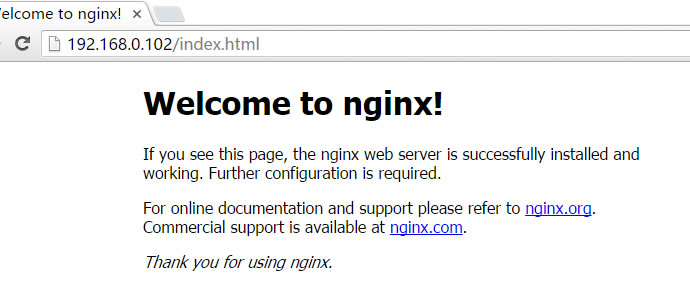
nginx已经启动了,现在来测试nginx。nginx在centos7下的默认文档要目录是/usr/share/nginx/html。默认的 index.html 文件一定已经在这目录下了。让我们检测下是否可以访问到这个测试 web 页,输入 http://nginx的ip地址/访问。

2、安装mariadb/mysql
centos/rhel 7使用了mariadb替代了默认的 mysql。作为mysql的简单替代品,mariadb保证了与mysql的api和命令行用法方面最大的兼容性。下面是关于怎么在 centos7上安装和配置maradb/mysql的操作示例。
|
1
2
3
|
$ sudo yum install mariadb-server
$ sudo systemctl start mariadb
$ sudo systemctl enable mariadb
|
在成功启动mariadb/mysql服务后,还要进行数据库的安全配置,如设置(非空)的root密码、删除匿名用户、锁定远程访问。执行如下代码:
|
1
|
$ sudo mysql_secure_installation
|
根据提示设置root密码,以及删除匿名用户等操作。
3、安装php
php是lemp包中一个重要的组件,它负责把存储在mariadb/mysql服务器的数据取出生成动态内容。为了lemp 需要,您至少需要安装上php-fpm和php-mysql两个模块。php-fpm(fastcgi 进程管理器)实现的是nginx服务器和生成动态内容的php应用程序的访问接口。php-mysql模块使php程序能访问 mariadb/mysql数据库。
首先检查当前安装的php包。
|
1
|
yum list installed | grep php
|
如果有安装的php包,先删除他们。
给yum安装添加源包。
|
1
2
|
rpm -uvh https://mirror.webtatic.com/yum/el7/epel-release.rpm
rpm -uvh https://mirror.webtatic.com/yum/el7/webtatic-release.rpm
|
运行yum install。
使用yum命令来定制php引擎,安装一些php扩展模块包。
|
1
|
yum install php56w.x86_64 php56w-cli.x86_64 php56w-common.x86_64 php56w-gd.x86_64 php56w-ldap.x86_64 php56w-mbstring.x86_64 php56w-mcrypt.x86_64 php56w-mysql.x86_64 php56w-pdo.x86_64
|
然后安装php fpm。
|
1
|
yum install php56w-fpm
|
最后,启动 php-fpm
|
1
2
|
$ sudo systemctl start php-fpm
$ sudo systemctl enable php-fpm
|
4、配置lemp,让nginx支持php
首先,禁用随php包安装的httpd服务。
|
1
|
$ sudo systemctl disable httpd
|
接下来,配置nginx虚拟主机,使得nginx可以通过php-fpm来处理php的任务。用文本编辑器打开/etc/nginx/conf.d/default.conf,然后按如下所示修改。
|
1
2
3
4
5
6
7
8
9
10
11
12
13
14
15
16
17
18
19
20
21
22
23
24
25
26
27
28
29
30
|
server {
listen 80;
server_name localhost;
root /usr/share/nginx/html;
index index.php index.html index.htm;
#charset koi8-r;
#access_log /var/log/nginx/log/host.access.log main;
location / {
}
#error_page 404 /404.html;
# redirect server error pages to the static page /50x.html
#
error_page 500 502 503 504 /50x.html;
location = /50x.html {
}
# proxy the php scripts to apache listening on 127.0.0.1:80
#
#location ~ \.php$ {
# proxy_pass http://127.0.0.1;
#}
# pass the php scripts to fastcgi server listening on 127.0.0.1:9000
#
location ~ \.php$ {
try_files $uri =404;
fastcgi_pass 127.0.0.1:9000;
fastcgi_index index.php;
fastcgi_param script_filename $document_root$fastcgi_script_name;
include fastcgi_params;
}
}
|
然后,配置php, 修改/etc/php.ini。
|
1
2
|
cgi.fix_pathinfo=1
date.timezone = prc
|
最后,测试nginx是否能处理php页面。在测试之前,请确保重启nginx和php-fpm。
|
1
2
|
$ sudo systemctl restart nginx
$ sudo systemctl restart php-fpm
|
创建一个叫名叫test.php的文件,然后写入如下内容,并放入/usr/share/nginx/html/目录。
|
1
2
3
|
<?php
phpinfo();
?>
|
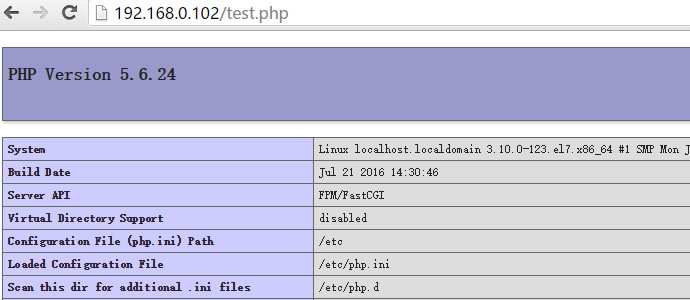
打开浏览器,输入 http://nginx的ip地址/test.php 。看到以下界面则lemp安装完成。

以上所述是小编给大家介绍的centos 7.x下的lemp环境搭建详细教程,希望对大家有所帮助
本文由主机测评网发布,不代表主机测评网立场,转载联系作者并注明出处:https://zhujiwo.jb51.net/centos/1306.html

